

Introduction
Moving Windows 11 to a new drive can improve storage capacity and help your computer run better, especially when you replace an older hard drive with an SSD. You can migrate windows 11 to new hard drive without setting up Windows and your apps from scratch, provided the cloning process completes successfully. When you clone windows 11 to ssd, you copy the operating system, required system partitions, and selected data to the new drive. Follow this checklist to prepare your drives, complete the cloning process, and verify that your computer starts correctly. If you need more guidance, read this guide on how to clone Windows 11 to a new drive.
Before You Start: The Checklist
Prepare your computer and both drives before cloning. A little preparation can help prevent data loss, boot errors, and other common problems.
Pre-Cloning Checklist
- Back up important files: Save your documents, photos, videos, and other important data to an external drive or a trusted cloud service.
- Check the new drive’s capacity: Make sure the target drive can hold all the data you plan to clone. Check the used space and the cloning tool’s requirements.
- Prepare a connection: Use an available SATA connection or a compatible USB-to-SATA adapter for a 2.5-inch SATA drive. For an NVMe SSD, use a compatible enclosure or motherboard slot.
- Check Windows activation: Open Settings and check your activation status. Keep your Microsoft account details and any available product key information.
- Allow enough time: Keep your computer connected to power and avoid interrupting the cloning process.
- Check drive compatibility: Confirm that your computer supports the new drive’s interface and physical size.
Important: Cloning can overwrite data on the destination drive. Check its contents before you begin and copy any important files elsewhere.
Step 1: Connect and Prepare the New Drive
First, connect the new SSD or hard drive to your computer. If you plan to replace your existing internal drive, you can connect the new drive through a compatible USB adapter or enclosure before installing it internally. Next, confirm that Windows recognizes the drive.
Initialize the Drive and Check Its Partitions
- Right-click the Start button and open Disk Management.
- Find the new drive in the disk list.
- If Windows asks you to initialize the disk, check that you selected the correct drive.
- Choose a suitable partition style, usually GPT for a modern Windows 11 installation.
- Follow your cloning tool’s instructions for preparing the destination drive.
If the drive already contains files, do not format it until you have backed them up. Some cloning tools prepare the destination automatically, while others require specific partition settings. You can use 4DDiG Partition Manager to explore its available disk and partition management features, including supported cloning options. Review the current product documentation to confirm which features your version supports.
Step 2: Clone the System Drive
After preparing the destination drive, open your chosen cloning software. Select your current Windows drive as the source and the new SSD or hard drive as the destination. This method lets you clone windows 11 without reinstalling the operating system, provided your source installation and destination drive meet the tool’s requirements.
Choose the Right Cloning Method
Cloning software may offer different ways to copy data. The right choice depends on your drive, file system, and software options.
File-level cloning
This method copies files and the data needed to recreate supported partitions. It may allow more flexibility when the destination has less capacity than the source, provided the used data fits and the software supports the required layout.
Sector-by-sector cloning
This method copies sectors from the source drive, including unused areas in many implementations. It can require a destination with enough capacity for the source’s copied sector range, so it may not work with a smaller drive. For most standard upgrades, use the cloning tool’s recommended method unless you have a specific reason to choose another option.
Follow These Cloning Steps
- Launch the cloning software and select the disk or system migration feature.
- Choose your current Windows 11 drive as the source.
- Select the new SSD or hard drive as the destination.
- Review the selected partitions. Include the EFI System Partition, Windows partition, and other required recovery or boot partitions.
- Check the destination layout and confirm that the software can fit the selected data.
- Review any warning about overwriting the destination drive.
- Start the cloning process and wait for the software to finish.
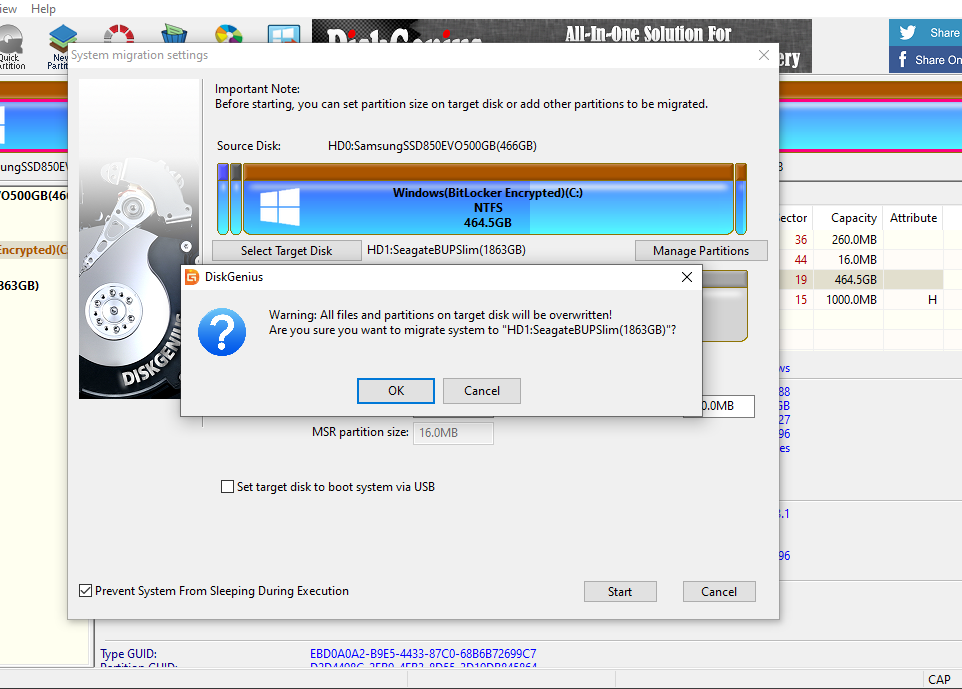
Do not disconnect either drive or shut down your computer during cloning. Follow any instructions to restart the computer if the software requests it. I cloned my laptop to an NVMe drive last year, and checking the destination drive and boot settings before starting helped me avoid unnecessary troubleshooting.
Step 3: Boot From the New Drive
Once the software confirms that cloning has finished, shut down your computer if the instructions require it. If you are replacing an internal drive, install the new drive in the appropriate slot. To transfer windows 11 to another drive successfully, you must also confirm that the computer can start Windows from the cloned drive.
Change the Boot Order
- Turn on your computer and enter the BIOS or UEFI settings using the key shown by your manufacturer.
- Open the Boot menu.
- Find the new SSD or hard drive in the boot options.
- Move the appropriate Windows Boot Manager entry to the top of the boot order.
- Save your changes and restart the computer.
The exact menu names vary by manufacturer.
If Windows starts correctly, shut down the computer and disconnect the old drive when practical. Then start the computer again to confirm that it can boot independently from the new drive. If Windows does not start, check the boot order, drive connections, and required system partitions. Use the cloning software’s support instructions or Windows recovery tools if needed.
After Cloning: Verification Checklist
Do not erase or format your old drive immediately after cloning. First, confirm that the new installation works correctly.
Use this checklist:
- Windows starts: Restart the computer more than once and confirm that Windows loads normally.
- Files are present: Open your documents, pictures, and other important folders.
- Apps work: Launch your commonly used programs and check their settings.
- Activation remains valid: Open Settings > System > Activation and review the status.
- Storage looks correct: Check File Explorer and Disk Management to confirm that Windows recognizes the new drive and its partitions.
- Performance looks normal: Open a few programs and confirm that the computer responds as expected.
- Old drive remains available: Keep the original drive unchanged until you have checked your files and confirmed that the new drive works reliably.
If you use BitLocker or another drive encryption feature, check its status and keep your recovery key available. Hardware or boot changes can sometimes trigger a recovery prompt.
Frequently Asked Questions
1. How do I back up and clone Windows 11 drive step by step?
Start by backing up your important files. Connect the destination drive, check its capacity, and use a cloning tool that supports your disk layout. Select the source and destination, include all required boot and system partitions, and start cloning. Finally, boot from the new drive and check your files, apps, and Windows activation.
2. How long does drive cloning take?
The time depends on the amount of data, drive speed, connection type, and cloning method. A USB connection may take longer than a direct internal connection. Check the software’s progress and avoid interrupting the process.
3. Can I clone Windows 11 to a smaller SSD?
Yes, some cloning tools support this when the destination can hold all selected data and the required partitions. You may need to reduce the source Windows partition first. However, sector-by-sector cloning and certain partition layouts may require a destination with greater capacity.
Conclusion
Following the correct steps makes it easier to clone windows 11 to new drive without reinstalling your operating system from scratch. Back up your files, prepare the destination, clone all required system partitions, and set the new drive as your boot device. Then use the verification checklist before removing or formatting your old drive. For a tool that offers disk and partition management features, visit the official 4DDiG Partition Manager product page and review its current cloning options and system requirements before proceeding.
